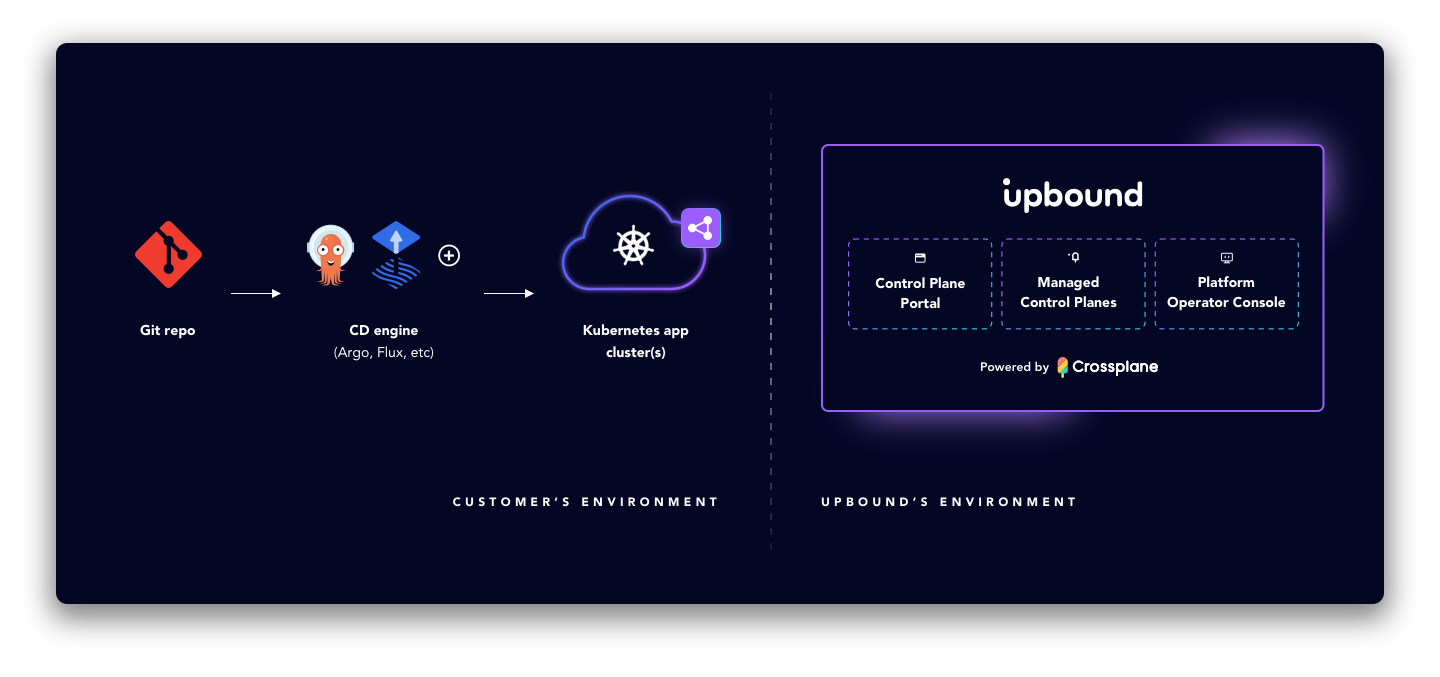
GitOps is an approach for managing a system by declaratively describing desired resources’ configurations in Git and using controllers to realize the desired state. Upbound’s managed control planes are compatible with this pattern and it’s strongly recommended you integrate GitOps in the platforms you build on Upbound.
Integrate with Argo CD and Flux
Argo CD and Flux are two examples of projects in the Kubernetes ecosystem commonly used for GitOps. You can use them in tandem with Upbound managed control planes to achieve GitOps flows. The sections below explain how to integrate these tools with Upbound.
Argo CD
Configure Argo CD
To configure Argo CD for Annotation resource tracking, edit the Argo CD
ConfigMap in the Argo CD namespace. Add
apiVersion: v1
kind: ConfigMap
metadata:
  name: argocd-cm
data:
  application.resourceTrackingMethod: annotation
This configuration turns off Argo CD auto pruning, preventing the deletion of Crossplane resources.
Connect an MCP to Argo CD
You can connect an external Argo CD instance to your managed control plane to sync Crossplane claims.
- Create a kubeconfig file for your MCP with the up CLI. Use the
up ctp kubeconfig getcommand and define the filename to save the kubeconfig to. This example saves the kubeconfig to a file namedmcp-kubeconfig.yaml.
up ctp kubeconfig get -a <organization> <control-plane-name> --token <token> -f mcp-kubeconfig.yaml
- Save the kubeconfig of the managed control plane as a secret on the external Kubernetes cluster where you installed Argo. The kubeconfig you get from Upbound has all the values required to translate into the format Argo expects like the below example. The secret should match the following configuration:
apiVersion: v1
kind: Secret
metadata:
  name: mcp-kubeconfig-secret
  labels:
    argocd.argoproj.io/secret-type: cluster
type: Opaque
stringData:
  name: <cluster-name-in-argo>
  server: https://proxy.upbound.io/v1/controlPlanes/<upbound-org-account-name>/<control-plane-name>/k8s
  config: |
    {
      "bearerToken": "<authentication token>",
      "tlsClientConfig": {
        "insecure": false,
        "caData": "<base64 encoded certificate>"
      }
    }
- Define a new Argo
Applicationresource representing your managed control plane. Inspec.destination.name, provide the same name as what you set in the preceding secret’sstringData.name.
apiVersion: argoproj.io/v1alpha1
kind: Application
metadata:
  name: managed-control-plane
spec:
  destination:
    name: <cluster-name-in-argo>
  project: default
  source:
    path: claims
    repoURL: <your-controlplane-repo-source>
    targetRevision: main
    directory:
      recurse: true
  syncPolicy:
    automated: {}
- Create claims in the Git repository that Argo is monitoring and observe how they’re transmitted to your managed control plane in Upbound.
Flux
You can use Flux to sync claims to your managed control planes. To do this, you need to have an instance of Flux running externally to Upbound, since you can’t install Flux locally in Upbound. Assuming you are running Flux elsewhere outside of Upbound, the steps to use Flux to sync claims are the following:
- Fetch your managed control plane’s API server endpoint so you can provide it to Flux. In the step below, use the up CLI to fetch the kubeconfig of your MCP and write it to a file.
up ctp kubeconfig get -a <account> <control-plane-name> --token <token> -f mcp-kubeconfig.yaml
- Create a secret on the external Kubernetes cluster where you installed Flux. This secret should contain the kubeconfig from the previous step.
kubectl create secret generic controlplane-kubeconfig --from-file=value=./mcp-kubeconfig.yaml -n flux-system
- Define a new Flux
Kustomizationresource representing your managed control plane and apply to your Flux cluster. The example manifest below assumes you store claims in your Git repository under aclaimsfolder.
# xp-kustomization.yaml
apiVersion: kustomize.toolkit.fluxcd.io/v1
kind: Kustomization
metadata:
  name: claim-sync
  namespace: flux-system
spec:
  interval: 5m0s
  path: ./claims
  prune: true
  sourceRef:
    kind: GitRepository
    name: flux-system
  kubeConfig:
    secretRef:
      name: controlplane-kubeconfig
- Apply a
Kustomizationto tell Flux about this resource
apiVersion: kustomize.config.k8s.io/v1beta1
kind: Kustomization
resources:
- xp-kustomization.yaml
- Create claims in the Git repository that Flux is monitoring and observe how they’re transmitted to your managed control plane in Upbound.
.spec.kubeConfig.secretRef.Name kubeConfig.SecretRef must exist in the same namespace as the Kustomization. See the Flux documentation for more information.Control plane connector
Upbound’s Managed Control Plane Connector (MCP Connector) is another way you can set up GitOps flows with Upbound managed control planes. MCP Connector is for users coming from open source Crossplane and who treated Crossplane as an add-on to an existing Kubernetes application cluster. In that world, users could interact with Crossplane APIs from the same cluster they deploy their applications to. This model breaks when users move their Crossplane instances into a managed solution in Upbound.
MCP Connector connects Kubernetes application clusters—running outside of Upbound–to your managed control planes running in Upbound. This allows you to interact with your managed control plane’s API right from the app cluster. The claim APIs you define via CompositeResourceDefinitions are available alongside Kubernetes workload APIs like Pod. In effect, MCP Connector providers the same experience as a locally installed Crossplane.
Managed control plane connector operations
The MCP Connector creates an APIService resource in your
Kubernetes cluster for every claim API in your control plane. Your
Kubernetes cluster sends every request for the claim API to the MCP Connector. The MCP Connector
makes the request to the Upbound control plane it’s connected to.
The claim APIs are available in your Kubernetes cluster just like all native Kubernetes API.
Installation
With the up CLI
Log in with the up CLI:
up login
Connect your app cluster to a namespace in an Upbound managed control plane with up controlplane connector install <control-plane-name> <namespace-to-sync-to>. This command creates a user token and installs the MCP Connector to your cluster.
--account option if it wasn’t specified during login.up controlplane connector install my-control-plane my-app-ns-1 --account my-org-name
The Claim APIs from your managed control plane are now visible in the cluster. You can verify this with kubectl api-resources.
kubectl api-resources
With Helm
The MCP Connector is also available as a Helm chart. First add the Upbound beta repository with the helm repo add command.
helm repo add upbound-beta https://charts.upbound.io/beta
Update the local Helm chart cache with helm repo update.
helm repo update
Install the MCP Connector Helm chart with helm install. Make sure to update the chart values with your own. You must provide:
mcp.account, provide an Upbound org account namemcp.name, provide the name of the managed control plane you want to connect tomcp.namespace, provide the namespace in your managed control plane to sync tomcp.token, an API token from Upbound used by the MCP Connector to allow for interaction with your managed control plane
helm install --wait mcp-connector upbound-beta/mcp-connector -n kube-system /
  --set mcp.account='your-upbound-org-account'
  --set mcp.name='your-control-plane-name'
  --set mcp.namespace='your-app-ns-1'
  --set mcp.token='replace-with-an-API-token-from-Upbound'
Uninstall
With the up CLI
Disconnect an app cluster that you prior installed the MCP connector on by running the following:
up ctp connector uninstall <namespace>
This command uninstalls the helm chart for the MCP connector from an app cluster. It moves any claims in the app cluster into the managed control plane at the specified namespace.
With Helm
You can uninstall MCP connector with Helm by running the following:
helm uninstall mcp-connector
Example usage
This example creates a control plane using Configuration EKS. KubernetesCluster is available as a claim API in your control plane. The following is an example object you can create in your control plane.
apiVersion: k8s.starter.org/v1alpha1
kind: KubernetesCluster
metadata:
  name: my-cluster
  namespace: default
spec:
  id: my-cluster
  parameters:
    nodes:
      count: 3
      size: small
    services:
      operators:
        prometheus:
          version: "34.5.1"
  writeConnectionSecretToRef:
    name: my-cluster-kubeconfig
After connecting your Kubernetes app cluster to the managed control plane, you can create the KubernetesCluster object in your
app cluster. Although your local cluster has an Object, the actual resources is in your managed control plane inside Upbound.
# Applying the claim YAML above.
# kubectl is set up to talk with your Kubernetes cluster.
kubectl apply -f claim.yaml
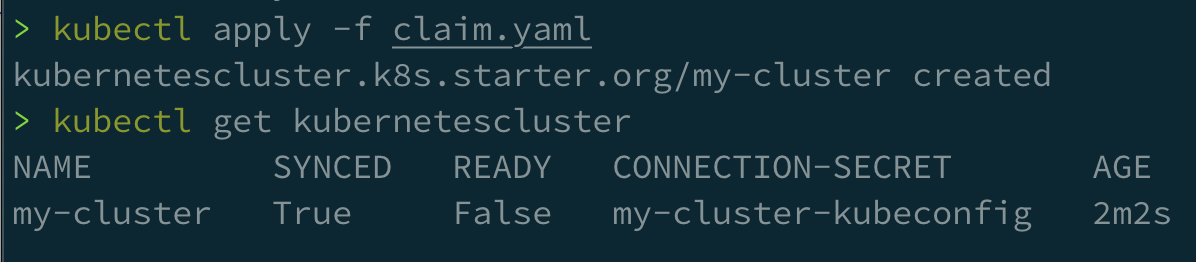
Once Kubernetes creates the object, view the console to see your object.

You can interact with the object through your cluster just as if it lives in your cluster.
Connect multiple app clusters to a managed control plane
Claims are store in a unique namespace in the Upbound managed control plane. Every cluster creates a new MCP namespace.

There’s no limit on the number of clusters connected to a single control plane. Control plane operators can see all their infrastructure in a central control plane.
Without using managed control planes and MCP Connector, users have to install Crossplane and providers for cluster. Each cluster requires configuration for providers with necessary credentials. With a single control plane where multiple clusters connected through Upbound tokens, you don’t need to give out any cloud credentials to the clusters.