Secrets Management
Upbound's Shared Secrets is a built in secrets management feature that provides an integrated way to manage secrets across your platform. It allows you to store sensitive data like passwords and certificates for your managed control planes as secrets in an external secret store.
This feature is a wrapper around the External Secrets Operator (ESO) that pulls secrets from external vaults and distributes them across your platform.
Benefits
The Shared Secrets feature allows you to:
- Access secrets from a variety of external secret stores without operation overhead
- Configure synchronization for multiple control planes in a group
- Store and manage all your secrets centrally
- Use Shared Secrets across all Upbound environments(Cloud and Disconnected Spaces)
- Synchronize secrets across groups of control planes while maintaining clear security boundaries
- Manage secrets at scale programmatically while ensuring proper isolation and access control
Understanding the Architecture
The Shared Secrets feature uses a hierarchical approach to centrally manage secrets and effectively control their distribution.
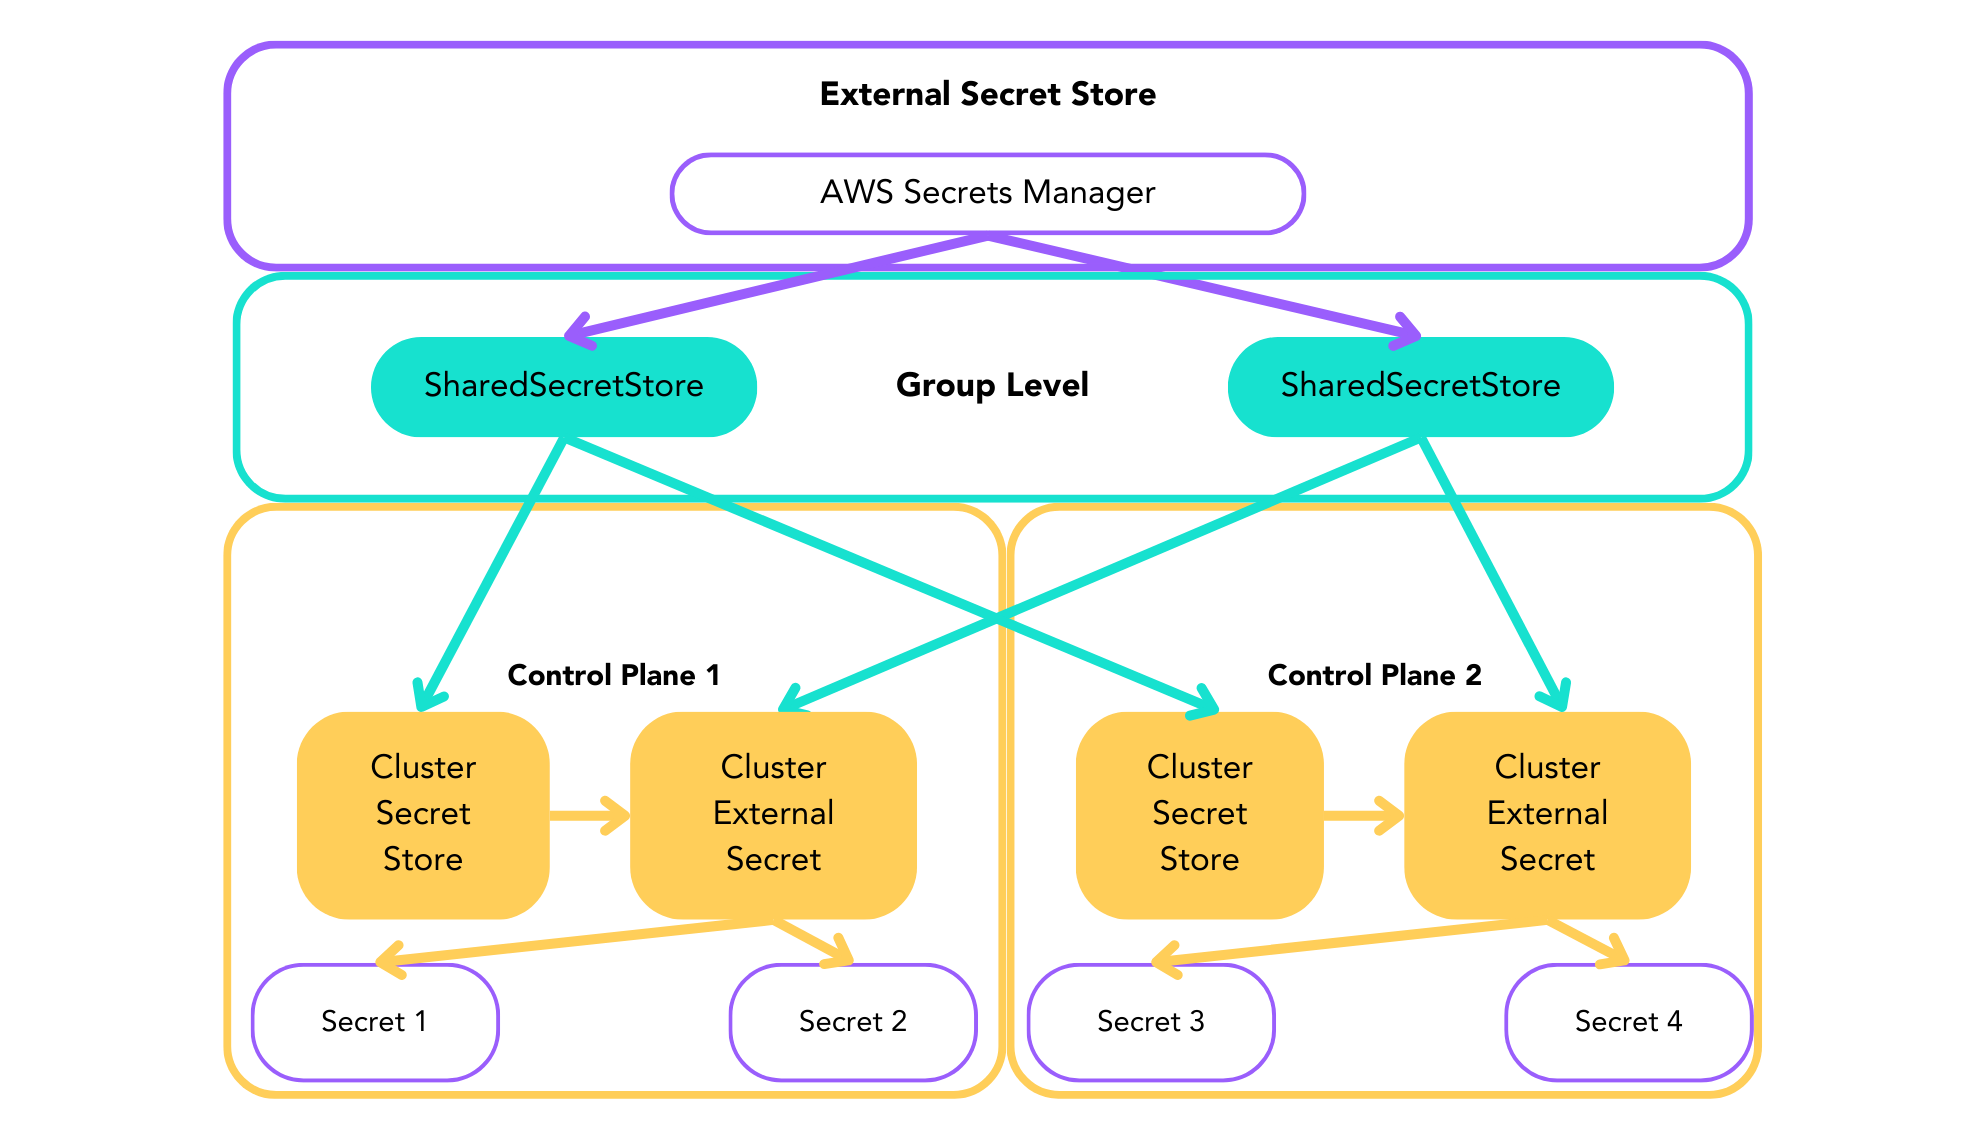
- The flow begins at the group level, where you define your secret sources and distribution rules
- These rules automatically create corresponding resources in your control planes
- In each control plane, specific namespaces receive the secrets
- Changes at the group level automatically propagate through this chain
Component configuration
Upbound Shared Secrets consists of two components:
- SharedSecretStore: Defines connections to external secret providers
- SharedExternalSecret: Specifies which secrets to synchronize and where
Connect to an External Vault
The SharedSecretStore component is the connection point to your external
secret vaults. It provisions ClusterSecretStore resources into control planes
within the group.
AWS Secrets Manager
In this example, you'll create a SharedSecretStore to connect to AWS Secrets Manager in us-west-2. Then apply access to all control planes labeled with environment: production, and make these secrets available in the default and crossplane-system namespaces.
You can configure access to AWS Secrets Manager using static credentials or workload identity.
While the underlying ESO API supports more auth methods, static credentials are currently the only supported auth method in Cloud Spaces.
Static credentials
-
Use the AWS CLI to create access credentials.
-
Create your access credentials.
# Create a text file with AWS credentials
cat > aws-credentials.txt << EOF
[default]
aws_access_key_id = <YOUR_ACCESS_KEY_HERE>
aws_secret_access_key = <YOUR_SECRET_ACCESS_KEY_HERE>
EOF
- Next,store the access credentials in a secret in the namespace you want to have access to the
SharedSecretStore.
kubectl create secret \
  generic aws-credentials \
  -n default \
  --from-file=creds=./aws-credentials.txt
- Create a
SharedSecretStorecustom resource file calledsecretstore.yaml. Paste the following configuration:
apiVersion: spaces.upbound.io/v1alpha1
kind: SharedSecretStore
metadata:
  name: aws-secrets
spec:
  # Define which control planes should receive this configuration
  controlPlaneSelector:
    labelSelectors:
      - matchLabels:
          environment: production

  # Define which namespaces within those control planes can access secrets
  namespaceSelector:
    names:
      - default
      - crossplane-system

  # Configure the connection to AWS Secrets Manager
  provider:
    aws:
      service: SecretsManager
      region: us-west-2
      auth:
        secretRef:
          accessKeyIDSecretRef:
            name: aws-credentials
            key: access-key-id
          secretAccessKeySecretRef:
            name: aws-credentials
            key: secret-access-key
Workload Identity with IRSA
You can also use AWS IAM Roles for Service Accounts (IRSA) depending on your organizations needs:
- Ensure you have deployed the Spaces software into an IRSA-enabled EKS cluster.
- Follow the AWS instructions to create an IAM OIDC provider with your EKS OIDC provider URL.
- Determine the Spaces-generated
controlPlaneIDof your control plane:
kubectl get controlplane <control-plane-name> -o jsonpath='{.status.controlPlaneID}'
- Create an IAM trust policy in your AWS account to match the control plane.
{
  "Version": "2012-10-17",
  "Statement": [
    {
      "Effect": "Allow",
      "Principal": {
        "Federated": "arn:aws:iam::<AWS account ID>:oidc-provider/<OIDC provider>"
      },
      "Action": "sts:AssumeRoleWithWebIdentity",
      "Condition": {
        "StringEquals": {
          "<OIDC provider>:aud": "sts.amazonaws.com",
          "<OIDC provider>:sub": [
"system:serviceaccount:mxp-<controlPlaneID>-system:external-secrets-controller"]
        }
      }
    }
  ]
}
- Update your Spaces deployment to annotate the SharedSecrets service account with the role ARN.
up space upgrade ... \
  --set controlPlanes.sharedSecrets.serviceAccount.customAnnotations."eks\.amazonaws\.com/role-arn"="<SPACES_ESO_IAM_ROLE_ARN>"
- Create a SharedSecretStore and reference the SharedSecrets service account:
apiVersion: spaces.upbound.io/v1alpha1
kind: SharedSecretStore
metadata:
  name: aws-sm
  namespace: default
spec:
  provider:
    aws:
      service: SecretsManager
      region: <aws-region>
      auth:
        jwt:
          serviceAccountRef:
            name: external-secrets-controller
  controlPlaneSelector:
    names:
    - <control-plane-name>
  namespaceSelector:
    names:
    - default
When you create a SharedSecretStore the underlying mechanism:
- Applies at the group level
- Determines which control planes should receive this configuration by the
controlPlaneSelector - Automatically creates a ClusterSecretStore inside each identified control plane
- Maintains a connection in each control plane with the ClusterSecretStore credentials and configuration from the parent SharedSecretStore
Upbound automatically generates a ClusterSecretStore in each matching control plane when you create a SharedSecretStore.
# Automatically created in each matching control plane
apiVersion: external-secrets.io/v1beta1
kind: ClusterSecretStore
metadata:
  name: aws-secrets  # Name matches the parent SharedSecretStore
spec:
  provider:
   upboundspaces:
      storeRef:
        name: aws-secret
When you create the SharedSecretStore controller, it replaces the provider with
a special provider called upboundspaces. This provider references the
SharedSecretStore object in the Spaces API. This avoids copying the actual cloud
credentials from Spaces to each control plane.
This workflow allows you to configure the store connection only once at the group level and automatically propagates to each control plane. Individual control planes can use the store without exposure to the group-level configuration and updates all child ClusterSecretStores when updated.
Azure Key Vault
While the underlying ESO API supports more auth methods, static credentials are currently the only supported auth method in Cloud Spaces.
Static credentials
- Use the Azure CLI to create a service principal and authentication file.
- Create a service principal and save credentials in a file:
{
  "appId": "myAppId",
  "displayName": "myServicePrincipalName",
  "password": "myServicePrincipalPassword",
  "tenant": "myTentantId"
}
- Store the credentials as a Kubernetes secret:
kubectl create secret \
  generic azure-secret-sp \
  -n default \
  --from-file=creds=./azure-credentials.json
- Create a SharedSecretStore referencing these credentials:
apiVersion: spaces.upbound.io/v1alpha1
kind: SharedSecretStore
metadata:
  name: azure-kv
spec:
  provider:
    azurekv:
      tenantId: "<your-tenant-id>"
      vaultUrl: "<your-vault-url>"
      authSecretRef:
        clientId:
          name: azure-secret-sp
          key: ClientID
        clientSecret:
          name: azure-secret-sp
          key: ClientSecret
  controlPlaneSelector:
    names:
    - <control-plane-name>
  namespaceSelector:
    names:
    - default
Workload Identity
You can also use Entra Workload Identity Federation to access Azure Key Vault without needing to manage secrets.
To use Entra Workload ID with AKS:
- Deploy the Spaces software into a workload identity-enabled AKS cluster.
- Retrieve the OIDC issuer URL of the AKS cluster:
az aks show --name "<CLUSTER_NAME>" \
    --resource-group "<RESOURCE_GROUP>" \
    --query "oidcIssuerProfile.issuerUrl" \
    --output tsv
- Use the Azure CLI to make a managed identity:
az identity create \
    --name "<USER_ASSIGNED_IDENTITY_NAME>" \
    --resource-group "<RESOURCE_GROUP>" \
    --location "<LOCATION>" \
    --subscription "<SUBSCRIPTION>"
- Look up the managed identity's client ID:
az identity show \
    --resource-group "<RESOURCE_GROUP>" \
    --name "<USER_ASSIGNED_IDENTITY_NAME>" \
    --query 'clientId' \
    --output tsv
- Update your Spaces deployment to annotate the SharedSecrets service account with the associated Entra application client ID from the previous step:
up space upgrade ... \
  --set controlPlanes.sharedSecrets.serviceAccount.customAnnotations."azure\.workload\.identity/client-id"="<SPACES_ESO_CLIENT_ID>" \
  --set-string controlPlanes.sharedSecrets.pod.customLabels."azure\.workload\.identity/use"="true"
- Determine the Spaces-generated
controlPlaneIDof your control plane. When you deploy akind: controlplanein a Space, the Spaces software deploys a set of pods in a new namespace following the formatmxp-<controlPlaneID>-system.
kubectl get controlplane <control-plane-name> -o jsonpath='{.status.controlPlaneID}'
- Create a federated identity credential.
FEDERATED_IDENTITY_CREDENTIAL_NAME=<FEDERATED_IDENTITY_CREDENTIAL_NAME>
USER_ASSIGNED_IDENTITY_NAME=<USER_ASSIGNED_IDENTITY_NAME>
RESOURCE_GROUP=<RESOURCE_GROUP>
AKS_OIDC_ISSUER=<AKS_OIDC_ISSUER>
CONTROLPLANE_ID=<CONTROLPLANE_ID>
az identity federated-credential create --name ${FEDERATED_IDENTITY_CREDENTIAL_NAME} --identity-name "${USER_ASSIGNED_IDENTITY_NAME}" --resource-group "${RESOURCE_GROUP}" --issuer "${AKS_OIDC_ISSUER}" --subject system:serviceaccount:"mxp-${CONTROLPLANE_ID}-system:external-secrets-controller" --audience api://AzureADTokenExchange
- Assign the
Key Vault Secrets Userrole to the user-assigned managed identity that you created earlier. This step gives the managed identity permission to read secrets from the key vault:
az role assignment create \
    --assignee-object-id "${IDENTITY_PRINCIPAL_ID}" \
    --role "Key Vault Secrets User" \
    --scope "${KEYVAULT_RESOURCE_ID}" \
    --assignee-principal-type ServicePrincipal
You must manually restart a workload's pod when you add the annotation to the running pod's service account. The Entra workload identity mutating admission webhook requires a restart to inject the necessary environment.
- Create a
SharedSecretStore. ReplacevaultURLwith the URL of your Azure Key Vault instance. ReplaceidentityIdwith the client ID of the managed identity created earlier:
apiVersion: spaces.upbound.io/v1alpha1
kind: SharedSecretStore
metadata:
  name: azure-kv
spec:
  provider:
    azurekv:
      authType: WorkloadIdentity
      vaultUrl: "<KEYVAULT_URL>"
  controlPlaneSelector:
    names:
    - <control-plane-name>
  namespaceSelector:
    names:
    - default
Google Cloud Secret Manager
You can configure access to Google Cloud Secret Manager using static credentials or workload identity. Below are instructions for configuring either. See the ESO provider API for more information.
While the underlying ESO API supports more auth methods, static credentials are currently the only supported auth method in Cloud Spaces.
Static credentials
-
Use the GCP CLI to create access credentials.
-
Save the output in a file called
gcp-credentials.json. -
Store the access credentials in a secret in the same namespace as the
SharedSecretStore.kubectl create secret \
generic gcpsm-secret \
-n default \
--from-file=creds=./gcp-credentials.json -
Create a
SharedSecretStore, referencing the secret created earlier. ReplaceprojectIDwith your GCP Project ID:
apiVersion: spaces.upbound.io/v1alpha1
kind: SharedSecretStore
metadata:
  name: gcp-sm
spec:
  provider:
    gcpsm:
      auth:
        secretRef:
          secretAccessKeySecretRef:
            name: gcpsm-secret
            key: creds
      projectID: <your-gcp-project>
  controlPlaneSelector:
    names:
    - <control-plane-name>
  namespaceSelector:
    names:
    - default
The example above maps a Shared Secret Store into a single namespace of a single control plane. Read control plane selection and namespace selection to learn how to map into one or more namespaces of one or more control planes.
Workload identity with Service Accounts to IAM Roles
To configure, grant the roles/iam.workloadIdentityUser role to the Kubernetes
service account in the control plane namespace to impersonate the IAM service
account.
- Ensure you've deployed Spaces on a Workload Identity Federation-enabled GKE cluster.
- Determine the Spaces-generated
controlPlaneIDof your control plane. When you deploy akind: controlplanein a Space, the Spaces software deploys a set of pods in a new namespace following the formatmxp-<controlPlaneID>-system.
kubectl get controlplane <control-plane-name> -o jsonpath='{.status.controlPlaneID}'
- Create a GCP IAM service account with the GCP CLI:
gcloud iam service-accounts create <IAM_SA_NAME> \
    --project=<IAM_SA_PROJECT_ID>
- Grant the IAM service account the role to access GCP Secret Manager:
SA_NAME=<IAM_SA_NAME>
IAM_SA_PROJECT_ID=<IAM_SA_PROJECT_ID>
gcloud projects add-iam-policy-binding IAM_SA_PROJECT_ID \
    --member "serviceAccount:SA_NAME@IAM_SA_PROJECT_ID.iam.gserviceaccount.com" \
    --role roles/secretmanager.secretAccessor
- When you enable the Shared Secrets feature, a service account gets created in each control plane for the External Secrets Operator. Apply a GCP IAM policy binding to associate this service account with the desired GCP IAM role.
PROJECT_ID=<PROJECT_ID>
PROJECT_NUMBER=<PROJECT_NUMBER>
CONTROLPLANE_ID=<CONTROLPLANE_ID>
gcloud projects add-iam-policy-binding projects/${PROJECT_ID} \
    --role "roles/iam.workloadIdentityUser" \
    --member=principal://iam.googleapis.com/projects/${PROJECT_NUMBER}/locations/global/workloadIdentityPools/${PROJECT_ID}.svc.id.goog/subject/ns/mxp-${CONTROLPLANE_ID}-system/sa/external-secrets-controller
- Update your Spaces deployment to annotate the SharedSecrets service account with GCP IAM service account's identifier:
up space upgrade ... \
  --set controlPlanes.sharedSecrets.serviceAccount.customAnnotations."iam\.gke\.io/gcp-service-account"="<SA_NAME>"
- Create a
SharedSecretStore. ReplaceprojectIDwith your GCP Project ID:
apiVersion: spaces.upbound.io/v1alpha1
kind: SharedSecretStore
metadata:
  name: gcp-sm
spec:
  provider:
    gcpsm:
      projectID: <your-gcp-project>
  controlPlaneSelector:
    names:
    - <control-plane-name>
  namespaceSelector:
    names:
    - default
The example above maps a Shared Secret Store into a single namespace of a single control plane. Read control plane selection and namespace selection to learn how to map into one or more namespaces of one or more control planes.
Manage your secret distribution
After you create your SharedSecretStore, you can define which secrets to distribute using SharedExternalSecret:
apiVersion: spaces.upbound.io/v1alpha1
kind: SharedExternalSecret
metadata:
  name: database-credentials
  namespace: default
spec:
  # Select the same control planes as your SharedSecretStore
  controlPlaneSelector:
    labelSelectors:
      - matchLabels:
          environment: production

  externalSecretSpec:
    refreshInterval: 1h
    secretStoreRef:
      name: aws-secrets  # References the SharedSecretStore name
      kind: ClusterSecretStore
    target:
      name: db-credentials
    data:
    - secretKey: username
      remoteRef:
        key: prod/database/credentials
        property: username
    - secretKey: password
      remoteRef:
        key: prod/database/credentials
        property: password
This configuration:
- Pulls database credentials from your external secret provider
- Creates secrets in all production control planes
- Refreshes the secrets every hour
- Creates a secret called
db-credentialsin each control plane
When you create a SharedExternalSecret at the group level, Upbound's system creates a template for the corresponding ClusterExternalSecrets in each selected control plane.
The example below simulates the ClusterExternalSecret that Upbound creates:
# Inside each matching control plane:
apiVersion: external-secrets.io/v1beta1
kind: ClusterExternalSecret
metadata:
  name: database-credentials
spec:
  refreshInterval: 1h
  secretStoreRef:
    name: aws-secrets
    kind: ClusterSecretStore
  data:
  - secretKey: username
    remoteRef:
      key: prod/database/credentials
      property: username
The hierarchy in this configuration is:
- SharedExternalSecret (group level) defines what secrets to distribute
- ClusterExternalSecret (control plane level) manages the distribution within each control plane
- Kubernetes Secrets (namespace level) are created in specified namespaces
Control plane selection
To configure which control planes in a group you want to project a SecretStore into, use the spec.controlPlaneSelector field. You can either use labelSelectors or the names of a control plane directly. A control plane matches if any of the label selectors match.
This example matches all control planes in the group that have environment: production as a label:
apiVersion: spaces.upbound.io/v1alpha1
kind: SharedSecretStore
metadata:
  name: my-secret-store
spec:
  controlPlaneSelector:
    labelSelectors:
      - matchLabels:
          environment: production
You can use the more complex matchExpressions to match labels based on an expression. This example matches control planes that have label environment: production or environment: staging:
apiVersion: spaces.upbound.io/v1alpha1
kind: SharedSecretStore
metadata:
  name: my-secret-store
spec:
  controlPlaneSelector:
    labelSelectors:
      - matchExpressions:
        - { key: environment, operator: In, values: [production,staging] }
You can also specify the names of control planes directly:
apiVersion: spaces.upbound.io/v1alpha1
kind: SharedSecretStore
metadata:
  name: my-secret-store
spec:
  controlPlaneSelector:
    names:
    - controlplane-dev
    - controlplane-staging
    - controlplane-prod
Namespace selection
To configure which namespaces within each matched control plane to project the secret store into, use spec.namespaceSelector field. The projected secret store only appears in the namespaces matching the provided selector. You can either use labelSelectors or the names of namespaces directly. A control plane matches if any of the label selectors match.
For all control planes matched by spec.controlPlaneSelector, This example matches all namespaces in each selected control plane that have team: team1 as a label:
apiVersion: spaces.upbound.io/v1alpha1
kind: SharedSecretStore
metadata:
  name: my-secret-store
spec:
  namespaceSelector:
    labelSelectors:
      - matchLabels:
          team: team1
You can use the more complex matchExpressions to match labels based on an expression. This example matches namespaces that have label team: team1 or team: team2:
apiVersion: spaces.upbound.io/v1alpha1
kind: SharedSecretStore
metadata:
  name: my-secret-store
spec:
  namespaceSelector:
    labelSelectors:
      - matchExpressions:
        - { key: team, operator: In, values: [team1,team2] }
You can also specify the names of namespaces directly:
apiVersion: spaces.upbound.io/v1alpha1
kind: SharedSecretStore
metadata:
  name: my-secret-store
spec:
  namespaceSelector:
    names:
    - team1-namespace
    - team2-namespace
Configure secrets directly in a control plane
The above explains using group-scoped resources to project secrets into multiple control planes. You can also use ESO API types directly in a control plane as you would in standalone Crossplane or Kubernetes.
See the ESO documentation for a full guide on using the API types.
Best practices
When you configure secrets management in your Upbound environment, keep the following best practices in mind:
Use consistent labeling schemes across your control planes for predictable and manageable secret distribution.
Organize your secrets in your external provider using a hierarchical structure that mirrors your control plane organization.
Set appropriate refresh intervals based on your security requires and the nature of the secrets.
Use namespace selection sparingly to limit secret distribution to only the namespaces that need them.
Use separate tokens for each environment. Keep them in distinct SharedSecretStores. Users could bypass SharedExternalSecret selectors by creating ClusterExternalSecrets directly in control planes. This grants access to all secrets available to that token.
Document your secret management architecture, including which control planes should receive which secrets.