Control Planes
Control planes in Upbound are fully isolated Crossplane control plane instances that Upbound manages for you. This means:
- the underlying lifecycle of infrastructure (compute, memory, and storage) required to power your instance.
- scaling of the infrastructure.
- the maintenance of the core Crossplane components that make up a control plane.
This lets users focus on building their APIs and operating their control planes, while Upbound handles the rest. Each control plane has its own dedicated API server connecting users to their control plane.
Control plane architecture
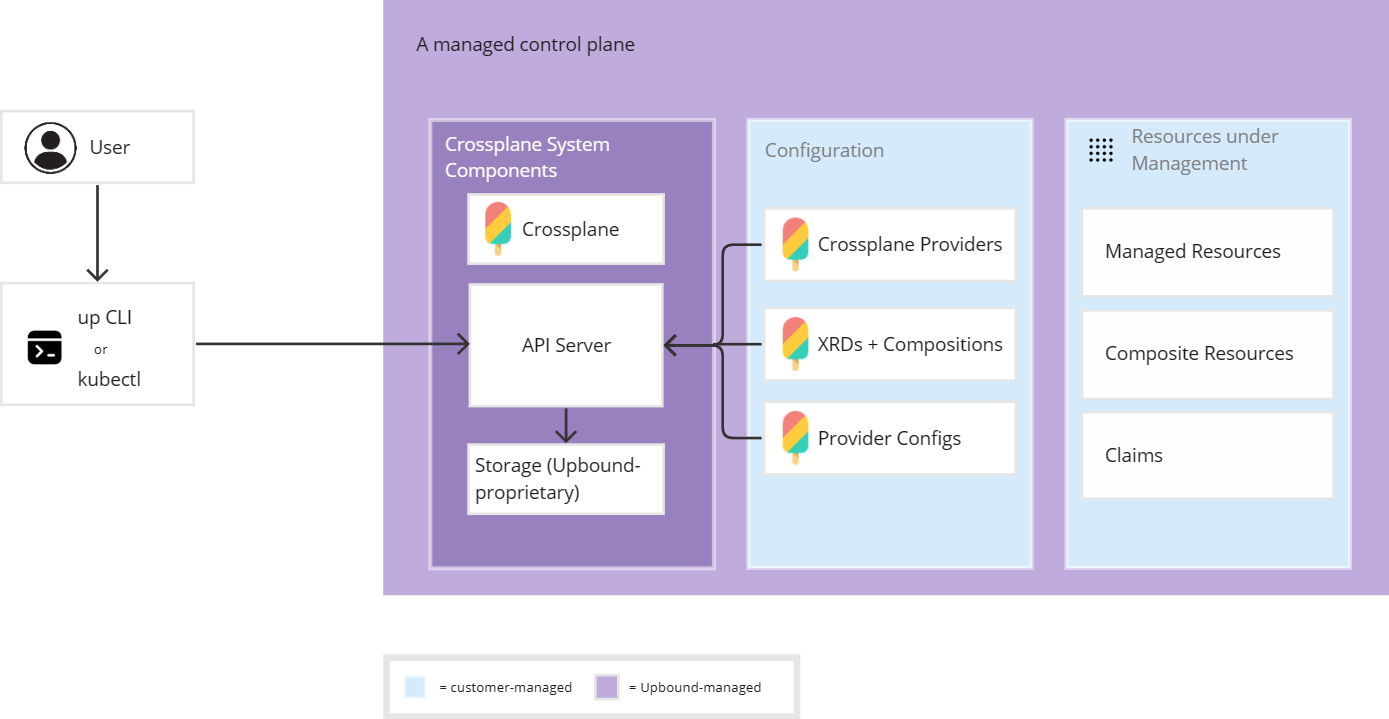
Along with underlying infrastructure, Upbound manages the Crossplane system components. You don't need to manage the Crossplane API server or core resource controllers because Upbound manages your control plane lifecycle from creation to deletion.
Crossplane API
Each control plane offers a unified endpoint. You interact with your control plane through Kubernetes and Crossplane API calls. Each control plane runs a Kubernetes API server to handle API requests. You can make API calls in the following ways:
- Direct calls: HTTP/gRPC
- Indirect calls: the up CLI, Kubernetes clients such as kubectl, or the Upbound Console.
Like in Kubernetes, the API server is the hub for all communication for the control plane. All internal components such as system processes and provider controllers act as clients of the API server.
Your API requests tell Crossplane your desired state for the resources your control plane manages. Crossplane attempts to constantly maintain that state. Crossplane lets you configure objects in the API either imperatively or declaratively.
Crossplane versions and features
Upbound automatically upgrades Crossplane system components on control planes to new Crossplane versions for updated features and improvements in the open source project. With automatic upgrades, you choose the cadence that Upbound automatically upgrades the system components in your control plane. You can also choose to manually upgrade your control plane to a different Crossplane version.
For detailed information on versions and upgrades, refer to the release notes and the automatic upgrade documentation. If you don't enroll a control plane in a release channel, Upbound doesn't apply automatic upgrades.
Features considered "alpha" in Crossplane are by default not supported in a control plane unless otherwise specified.
Hosting environments
Every control plane in Upbound belongs to a control plane group. Control plane groups are a logical grouping of one or more control planes with shared objects (such as secrets or backup configuration). Every group resides in a Space in Upbound, which are hosting environments for control planes.
Think of a Space as being conceptually the same as an AWS, Azure, or GCP region. Regardless of the Space type you run a control plane in, the core experience is identical.
Management
Create a control plane
You can create a new control plane from the Upbound Console, up CLI, or with Kubernetes clients such as kubectl.
- up CLI
- kubectl
To use the CLI, run the following:
up ctp create <name-of-control-plane>
To learn more about control plane-related commands in up, go to the CLI reference documentation.
You can create and manage control planes declaratively in Upbound. Before you begin, ensure you're logged into Upbound and set the correct context:
up login
# Example: acmeco/upbound-gcp-us-west-1/default
up ctx ${yourOrganization}/${yourSpace}/${yourGroup}
#controlplane-a.yaml
apiVersion: spaces.upbound.io/v1beta1
kind: ControlPlane
metadata:
  name: controlplane-a
spec:
  crossplane:
    autoUpgrade:
      channel: Rapid
kubectl apply -f controlplane-a.yaml
Connect directly to your control plane
Each control plane offers a unified endpoint. You interact with your control plane through Kubernetes and Crossplane API calls. Each control plane runs a Kubernetes API server to handle API requests.
You can connect to a control plane's API server directly via the up CLI. Use the up ctx command to set your kubeconfig's current context to a control plane:
# Example: acmeco/upbound-gcp-us-west-1/default/ctp1
up ctx ${yourOrganization}/${yourSpace}/${yourGroup}/${yourControlPlane}
To disconnect from your control plane and revert your kubeconfig's current context to the previous entry, run the following:
up ctx ..
You can also generate a kubeconfig file for a control plane with up ctx -f.
up ctx ${yourOrganization}/${yourSpace}/${yourGroup}/${yourControlPlane} -f - > ctp-kubeconfig.yaml
To learn more about how to use up ctx to navigate different contexts in Upbound, read the CLI documentation.
Configuration
When you create a new control plane, Upbound provides you with a fully isolated instance of Crossplane. Configure your control plane by installing packages that extend its capabilities, like to create and manage the lifecycle of new types of infrastructure resources.
You're encourage to install any available Crossplane package type (Providers, Configurations, Functions) available in the Upbound Marketplace on your control planes.
Install packages
Below are a couple ways to install Crossplane packages on your control plane.
- up CLI
- kubectl
- Continuous Delivery Engine
Use the up CLI to install Crossplane packages from the Upbound Marketplace on your control planes. Connect directly to your control plane via up ctx. Then, to install a provider:
up ctp provider install xpkg.upbound.io/upbound/provider-family-aws
To install a Configuration:
up ctp configuration install xpkg.upbound.io/upbound/platform-ref-aws
To install a Function:
up ctp function install xpkg.upbound.io/crossplane-contrib/function-kcl
You can use kubectl to directly apply any Crossplane manifest. Below is an example for installing a Crossplane provider:
cat <<EOF | kubectl apply -f -
apiVersion: pkg.crossplane.io/v1
kind: Provider
metadata:
  name: provider-family-aws
spec:
  package: xpkg.upbound.io/upbound/provider-family-aws:v1.20.0
For production-grade scenarios, it's recommended you configure your control plane declaratively via Git plus a Continuous Delivery (CD) Engine such as Argo. For guidance on this topic, read GitOps with control planes.
Configure Crossplane ProviderConfigs
ProviderConfigs with OpenID Connect
Use OpenID Connect (OIDC) to authenticate to Upbound control planes without credentials. OIDC lets your control plane exchange short-lived tokens directly with your cloud provider. Read how to connect control planes to external services to learn more.
Generic ProviderConfigs
The Upbound Console doesn't allow direct editing of ProviderConfigs that don't support Upbound authentication. To edit these ProviderConfigs on your control plane, connect to the control plane directly by following the instructions in the previous section and using kubectl.
Configure secrets
Upbound gives users the ability to configure the synchronization of secrets from external stores into control planes. Configure this capability at the group-level, explained in the Spaces documentation.
Configure backups
Upbound gives users the ability to configure backup schedules, take impromptu backups, and conduct self-service restore operations. Configure this capability at the group-level, explained in the Spaces documentation.
Configure telemetry
Upbound gives users the ability to configure the collection of telemetry (logs, metrics, and traces) in their control planes. Using Upbound's built-in OTEL support, you can stream this data out to your preferred observability solution. Configure this capability at the group-level, explained in the Spaces documentation.