Connect or disconnect a Space
This feature is in preview. You must deploy and enable the Query API and enable Upbound RBAC to connect a Space to Upbound.
Upbound allows you to connect self-hosted Spaces and enables a streamlined operations and debugging experience in your Console.
Usage
Connect
Before you begin, make sure you have:
- An existing Upbound organization in Upbound SaaS.
- The
upCLI installed and logged into your organization kubectlinstalled with the kubecontext of your self-hosted Space cluster.- A
token.jsonlicense, provided by your Upbound account representative. - You enabled the Query API in the self-hosted Space.
Create a new UPBOUND_SPACE_NAME. If you don't create a name, up automatically generates one for you:
export UPBOUND_SPACE_NAME=your-self-hosted-space
With up CLI
The command tries to connect the Space to the org account context pointed at by your up CLI profile. Make sure you've logged into Upbound SaaS with up login -a <org-account> before trying to connect the Space.
Connect the Space to the Console:
up space connect "${UPBOUND_SPACE_NAME}"
This command registers the Space in your Upbound organization and creates a robot and robot token for the Space to authenticate with. It stores the token in a secret and installs the Connect agent in the upbound-system namespace of your Space.
up space connect installs the agent version bundled with your up CLI release and doesn't expose agent settings such as proxy variables. To configure a proxy or choose the agent version, use the Helm installation.
With Helm
Export your Upbound org account name to an environment variable called UPBOUND_ORG_NAME. You can see this value by running up org list after logging on to Upbound.
export UPBOUND_ORG_NAME=your-org-name
Create a new robot token and export it to an environment variable called UPBOUND_TOKEN:
up robot create "${UPBOUND_SPACE_NAME}" --description="Robot used for authenticating Space '${UPBOUND_SPACE_NAME}' with Upbound Connect"
export UPBOUND_TOKEN=$(up robot token create "$UPBOUND_SPACE_NAME" "$UPBOUND_SPACE_NAME" --file - | jq -r '.token')
Follow the jq installation guide if your machine doesn't include
it by default.
Create a secret containing the robot token:
kubectl create secret -n upbound-system generic connect-token --from-literal=token=${UPBOUND_TOKEN}
Specify your username and password for the helm OCI registry:
jq -r .token $SPACES_TOKEN_PATH | helm registry login xpkg.upbound.io -u $(jq -r .accessId $SPACES_TOKEN_PATH) --password-stdin
In the same cluster where you installed the Spaces software, install the Upbound connect agent with your token secret.
helm -n upbound-system upgrade --install agent \
  oci://xpkg.upbound.io/spaces-artifacts/agent \
  --version "0.0.0-1208.g54c1262" \
  --set "global.space=${UPBOUND_SPACE_NAME}" \
  --set "global.organization=${UPBOUND_ORG_NAME}" \
  --set "global.tokenSecret=connect-token" \
  --set "image.repository=xpkg.upbound.io/spaces-artifacts/agent" \
  --set "registration.image.repository=xpkg.upbound.io/spaces-artifacts/register-init" \
  --set "registration.enabled=true" \
  --set "imagePullSecrets[0].name=upbound-pull-secret" \
  --wait
Use an HTTP proxy
The Connect agent respects HTTP_PROXY, HTTPS_PROXY, and NO_PROXY for outbound traffic to Upbound. Set them on the agent with extraEnv and on the registration init container with registration.extraEnv. If you use Zscaler or a similar corporate forward proxy, use the same pattern for both as shown below.
| Variable | Description |
|---|---|
HTTP_PROXY | HTTP proxy URL |
HTTPS_PROXY | HTTPS proxy URL |
NO_PROXY | Comma-separated hosts that bypass the proxy |
Example agent-proxy-values.yaml:
extraEnv:
  - name: HTTP_PROXY
    value: "http://proxy.example.com:8080"
  - name: HTTPS_PROXY
    value: "http://proxy.example.com:8080"
  - name: NO_PROXY
    value: "10.0.0.0/8,.svc.cluster.local,localhost,127.0.0.1"
registration:
  extraEnv:
    - name: HTTP_PROXY
      value: "http://proxy.example.com:8080"
    - name: HTTPS_PROXY
      value: "http://proxy.example.com:8080"
    - name: NO_PROXY
      value: "10.0.0.0/8,.svc.cluster.local,localhost,127.0.0.1"
Install or upgrade using that file:
helm -n upbound-system upgrade --install agent \
  oci://xpkg.upbound.io/spaces-artifacts/agent \
  --version "0.0.0-1208.g54c1262" \
  --set "global.space=${UPBOUND_SPACE_NAME}" \
  --set "global.organization=${UPBOUND_ORG_NAME}" \
  --set "global.tokenSecret=connect-token" \
  --set "image.repository=xpkg.upbound.io/spaces-artifacts/agent" \
  --set "registration.image.repository=xpkg.upbound.io/spaces-artifacts/register-init" \
  --set "registration.enabled=true" \
  --set "imagePullSecrets[0].name=upbound-pull-secret" \
  -f agent-proxy-values.yaml \
  --wait
View your Space in the Console
Go to the Upbound Console, log in, and choose the newly connected Space from the Space selector dropdown.
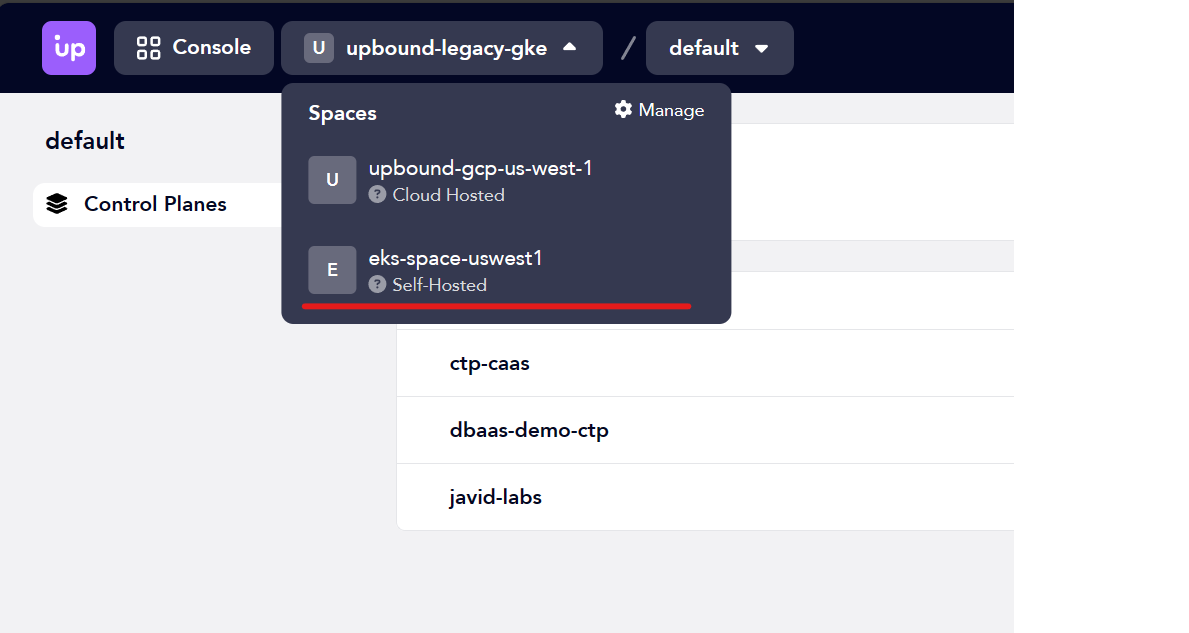
You can only connect a self-hosted Space to a single organization at a time.
Disconnect
With up CLI
To disconnect a self-hosted Space or a deleted self-hosted Space, run the following command:
up space disconnect "${UPBOUND_SPACE_NAME}"
If the Space still exists, this command uninstalls the Connect agent and deletes the associated service account and permissions.
With Helm
To disconnect a self-hosted Space or a deleted self-hosted Space, run the following command:
helm delete -n upbound-system agent
Clean up the robot token you created for this self-hosted Space:
up robot delete "${UPBOUND_SPACE_NAME}" --force
Security model
Architecture
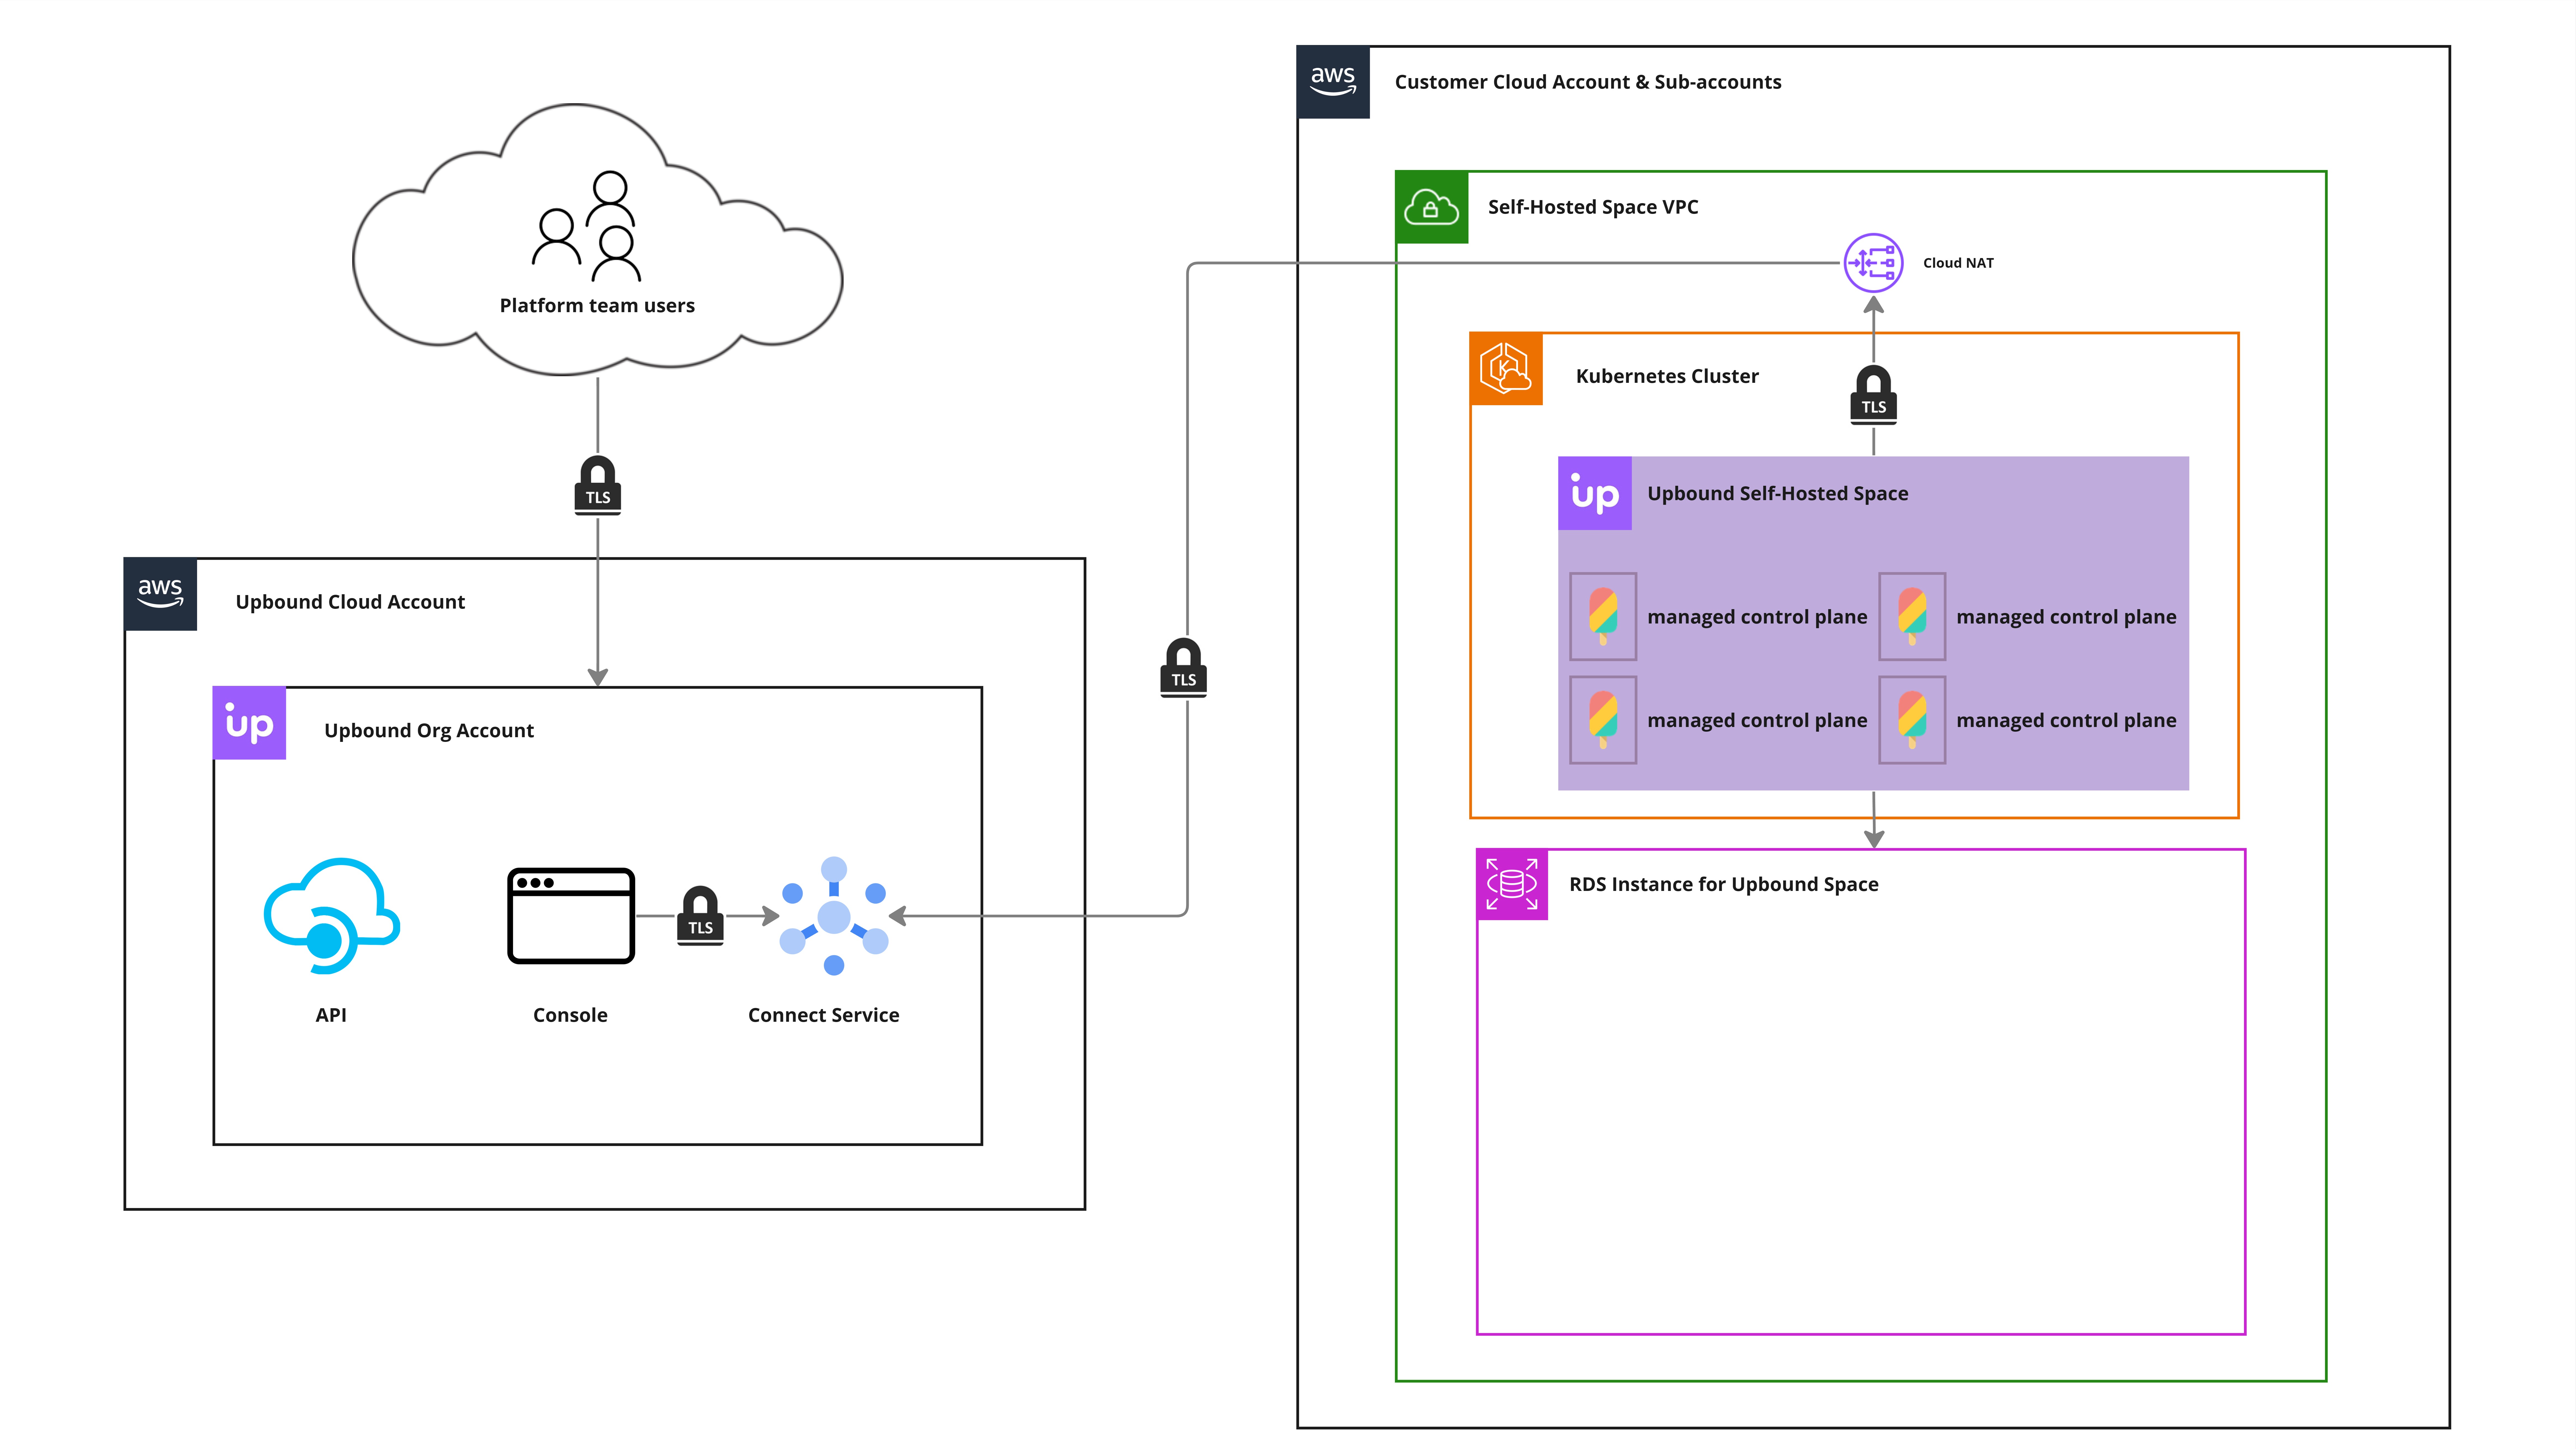
This diagram illustrates a self-hosted Space running in AWS connected to the global Upbound Console. The same model applies to a Space running in AKS, GKE, or other Kubernetes environments.
Data path
Upbound uses a Pub/Sub model over TLS to communicate between Upbound's global
console and your self-hosted Space. The Connect agent in your Space opens an
outbound, long-lived TLS connection to connect.upbound.io and subscribes to a
subject unique to your organization and Space. The connection is outbound only,
so the Space requires no inbound ports.
Add the following endpoints to your organization's list of allowed endpoints:
| Endpoint | Port | Purpose |
|---|---|---|
connect.upbound.io | TCP 4222 | Connect agent messaging |
api.upbound.io | TCP 443 | Space registration and Upbound API |
auth.upbound.io | TCP 443 | Authentication |
The connection to connect.upbound.io uses port 4222, not 443. Make sure your
firewall and proxy allow it.
The Upbound Console communicates to the Space through that endpoint. The data flow is:
- Users sign in to the Upbound Console, redirecting to authenticate with an organization's configured Identity Provider via SSO.
- Once authenticated, actions in the Console, like listing control planes or specific resource types from a control plane. These requests post as messages to the Upbound Connect service.
- The Connect agent receives the request over its existing connection and forwards it to the Spaces API in your cluster with the signed-in user's organization-scoped token. The Space authorizes the request against that user's Upbound permissions before fulfilling it.
- A user's self-hosted Space returns the results of the request to the Upbound Connect service and the Console renders the results in the user's browser session.
Upbound never stores data originated from a self-hosted Space. The data is transient and only exposed in the user's browser session. The Console needs this data to render your resources and control planes in the UI.
Data transmitted
Users interact with the Upbound Console to generate request queries to the Upbound Connect Service while exploring, managing, or debugging a self-hosted Space. These requests send data back to the user's browser session in the Console, including:
- Metadata for the Space
- Metadata for control planes in the state
- Configuration manifests for various resource types within your Space: Crossplane managed resources, composite resources, composite resource claims, Upbound shared secrets, Upbound shared backups, Crossplane providers, ProviderConfigs, Configurations, and Crossplane Composite Functions.
This data only concerns resource configuration. The data inside the managed resource in your Space isn't visible at any point.
Upbound can't see your data. Upbound doesn't have access to session-based data rendered for your users in the Upbound Console. Upbound only knows that you've connected a self-hosted Space and the metadata in the agent's periodic heartbeat, such as the Space name, the agent version, and the Spaces version.
Threat vectors
The Connect agent has no Kubernetes permissions of its own. It relays each request with the token of the user who made it, so the Space enforces that user's Upbound permissions on every request.
Only users with editor or administrative permissions can make changes using the Console like creating or deleting control planes or groups.